Roll of 2 pound Mass Loaded Vinyl.
- Made in the USA from virgin material, no odor.
- 1/4" thick - 2 pounds per sf
- Roll Size is 4' x 25' (100 sf)
FREE SHIPPING!

Roll of 2 pound Mass Loaded Vinyl.
FREE SHIPPING!
Roll of 2 pound MLV - 4' x 25' Roll for a total coverage of 100 square feet
Features:
2LB MLV is Best Used For:
How Much Do I Need:
Measure the square footage of the area that will need to be covered to determine amount needed. It is recommended to add an additional 10% to compensate for waste and overlapping of seams between studs.
Special discounted pricing applied when ordering 5 rolls or more. See above for details.
Additional Products to Consider:
FREE SHIPPING! Shipping is included in the price, see Shipping and Returns information to the right.
|
Printable Documents: |
Click to Print Mass Loaded Vinyl MSDS
Click to Print Mass Loaded Vinyl Product Data Sheet
|
What is Mass Loaded Vinyl: |
Mass Loaded Vinyl adds mass to your walls, ceilings, floors, pipes...etc without compromising on space. It provides instant mass with damping to any location. By adding mass to an existing structure, soundproofing properties are significantly boosted, since soundwaves cannot vibrate the structure easily.
Our 2 lb. Mass Loaded Vinyl has an STC of 31 when hanging by itself. It is the same material and has the same fire rating as other brand names in the field, ensuring compliance with architectural specifications at our low price. With all the new soundproofing products available, Mass Loaded Vinyl is still a favorite among studio builders and contractors.
|
Sample Applications: |
|
Physical Properties: |

|
Transmission Loss of MLV: |

|
Material Data: |
Click to Print Mass Loaded Vinyl Wall Installation Guide.
Mass Loaded Vinyl can be applied to walls, ceilings, floors and structures to create a sound barrier. Mass is a critical component in sound control and works by simply stopping sound from being able to vibrate the structure due to its heavy weight.
Please read through the installation guide before installing your MLV.
|
STEP 1: MEASURE AND TRIM YOU MLV |
||||
 |
Measure your wall from top to bottom. Deduct 1/8” – 1/4” from total height. Unroll your MLV on the floor. With a utility knife, use a straight edge ruler to cut a square edge evenly through the MLV. {See Figure 1} You do not need to cut through the material fully, once it is scored, it will come apart easily. The MLV can also be cut with a heavy duty scissor. |
|||
|
STEP 2: PREPARE YOUR WALL FOR INSTALLATION |
||||
 |
For superior soundproofing results, use Acoustical Outlet Backer Putty Pad around all electrical outlets and other obstacles. {See Figure 2} | |||
|
STEP 3: APPLYING YOUR MLV |
||||
 |
This step requires the work of two people. The MLV is applied over the fiberglass installation and beneath the sheetrock. With the help of another, hold the MLV in place, starting at the upper corner of the wall. Ensure the sheet is straight along the ceiling and is evenly spaced between the floor and ceiling {See Figure 3} Fasteners: Any type of fastener will work (especially if the MLV will be covered with drywall) we suggest roofing nails or screws with washers, however you can also use a pneumatic cap stapler. |
|||
 |
Placement: Place fasteners every 8” along the top and bottom plate {See Figure 4} and down the length of the stud. | |||
|
STEP 4: EXPOSE YOUR ELECTRICAL OUTLET BOXES |
||||
 |
Be careful not to cover electrical outlets boxes. It is best to expose the outlets boxes as you install each length of MLV. Find the electrical box in your wall and gently press the MLV against the box. Using a razor blade carefully cut the opening along the edges of the box. Keep this hole tight as possible to the electrical box so that you maintain a good seal. {See Figure 5} Any extra gaps can be filled with Acoustical Caulk. Continue as above until your entire wall or ceiling is covered in MLV. |
|||
|
STEP 5: FINISH YOUR SEAMS |
||||
 |
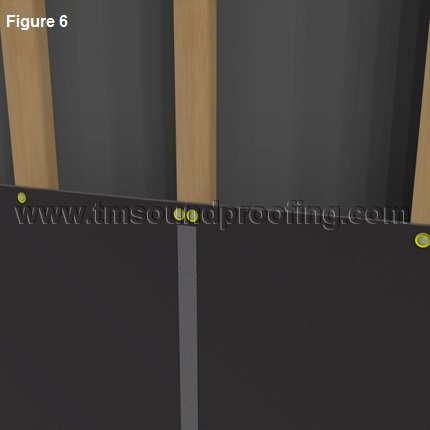
Where MLV seams fall on a stud, butt pieces against one another on the stud and fasten into place. You can add a strip of PVC Tape on the seam. {See Figures 6 and 7} We highly recommend that you end all MLV seams on a stud, as free hanging seams may come apart with time. |
|||
 |
||||
 |
Where MLV seams falls between studs, overlap pieces by 2" and tape seams with PVC Tape or similar tap. {See Figure 8} | |||
 |
Notch the ends to lay flat. {See Figure 9} | |||
Once all strips of MLV have been applied, drywall can be installed above it and you can be ensured a sound-secure structure! For more information about MLV, contact us or call us at 845-352-3200.