Heavy Duty High Sound Automatic Door Bottom

Heavy Duty High Sound Automatic Door Bottom

High Sound Control Rated Heavy Duty Automatic Door Bottom with high quality double neoprene seal, which can fill gaps up to .75". Can be applied as surface mounted or semi mortised application. Available in two anodized finishes in standard stock sizes (Can also be trimmed on the field).

Special Discounts apply to orders over $1,000.00 See Product Descriptions for details.

Price: $125.50
Select Color
Size
Qty
Save to wishlist
Made in USA
Fast turnaround
SKU DSZ367AA32
Description

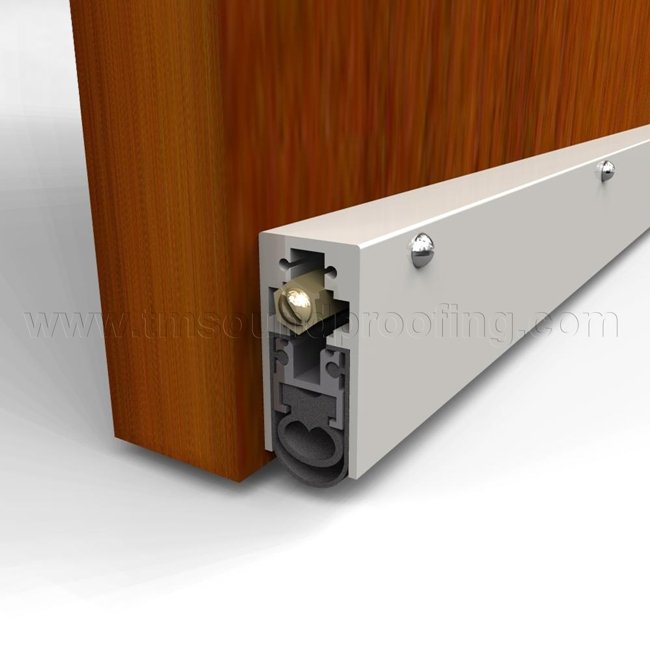
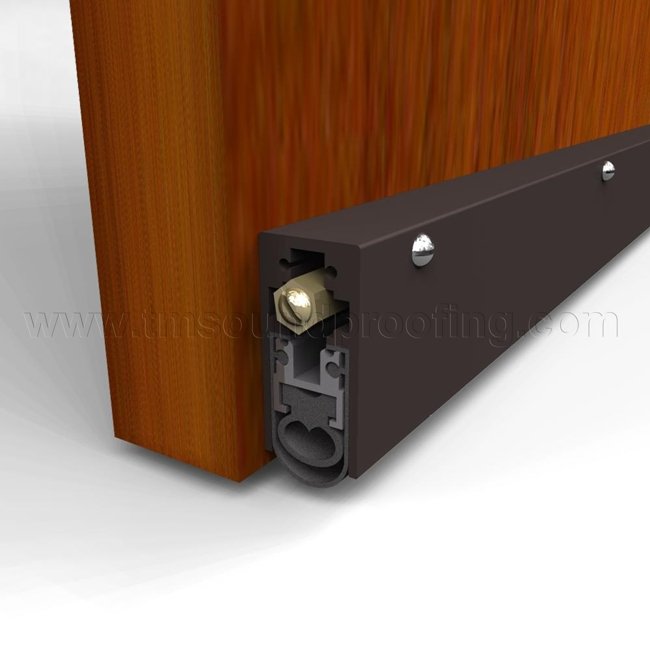
This "High Sound" automatic door bottom is designed and built to provide the ultimate in sound reduction. It features a double neoprene seal (See images above) that provide maximum sound reduction especially when used  together with our Soundproof Door Saddle.

This product is available as a surface mounted or semi-mortised application, as shown in the illustrations. It is non-handed and can be applied directly over the floor surface or above a doorway saddle, though a saddle is recommended for higher sound control (a saddle is also highly recommended when applied over a carpeted area). Available in two anodized finishes and in standard stock sizes. Installation screws and instructions provided. 

Not sure what size you need? See How to Measure for an Automatic Door Bottom.

Custom Sizing: Custom sizes up to 60" can be purchased through our office. Please contact us at 845-388-1200.

How it Works:

This product utilizes a concealed flat spring mechanism which is activated by the pressure of closing the door (The brass nut at the head gets pushed in by the doors jamb, which lowers the seal). The high quality neoprene rubber seal drops, filling gaps up to 1”, upon the closing of door to create a tight seal and raises up automatically when the door is opened to ensure smooth door operation. Our door bottoms have been tested through 5 million cycles and provide the same excellent quality as our mortised automatic door bottom. For more information, see About Automatic Door Bottoms.

Automatic Door Bottom can be trimmed on the field up to 3-4", depending on the size ordered. See installation guide.

Note: for maximum sound control, we recommend keeping the gap between the door and floor at no more than 1/2". Larger gaps can be treated with a doorway saddle or an added wooden strip to the underside of the door.

For a complete soundproof seal, make sure you completely seal your door with our high quality Soundproof Gasketing

Special Discounts on Our Door Hardware:

No Coupon Code Needed. Discount automatically applied when added to shopping cart.

Spend $1,00.00, get 5% off plus free shipping
Spend $1,500.00, get 10% off plus free shipping

See our Monthy Specials and Discounts for more great Soundproofing Savings!

Please note, images are for illustrative purposes only. They are not actual photos. Therefore, actual colors may vary slightly and size may be enlarged to show detail. For exact measurements, see product specs.

For international orders please call 845-388-1200 or email global@tmsoundproofing.com.

Product Data

Click to Print Product Specs

Surface Mounted: 

Semi-Moritsed:

Surface Mounted, High Sound Automatic Door Bottom Semi-Mortised, High Sound Automatic Door Bottom, by Trademark Soundproofing

Compliance Rating for Automatic Door Bottom

Installation Guide

Click here for a Printable Copy of How to Install an Automatic Door Bottom.

Automatic Door Bottoms are available with three mounting options: Surface Mounted, Semi-Mortised and Fully Mortised. A surface mounted application can be applied without removing the door from its hinges. For a semi-mortised, if the rabbet in the door is cut-out already, the door does not need to be removed. For a fully mortised application the door should be removed before starting.

STEP 1: SIZING YOUR DOOR BOTTOM:

 
  Once your door is ready for installation you need to determine the size required for your door bottom:
  • For a Surface Mounted Application: Measure the distance between the two stop moldings, or if a perimeter door gasket is applied,
    measure the distance between the two installed gaskets, then minus 1/8-1/4"” (.125”) from the total distance. That is the size needed for your door bottom.
  • For a Semi-Mortised and Fully Mortised Application: Measure your door from side to side; that is the measurement needed for your automatic door bottom.
For visual presentation see How to Measure for an Automatic Door Bottom.
 
How to Install an Automatic Door Bottom- Figure 1

Once you have determined the size needed, if necessary, trim your door bottom.
Use a chop saw or table saw to create a perfectly straight cut.

Note, Only trim opposite the actuating plunger, brass nut. (Trimming from the brass nut side will ruin your ADB).

 
How to Install an Automatic Door Bottom- Figure 1 You can trim from the edge up to one inch of the screw in the side wall of the ADB.  

STEP 2: PREP FOR ATTACHING AUTOMATIC DOOR BOTTOM:

 
How to Install an Automatic Door Bottom- Figure 3

Surface Mounted and Semi-Mortised models need to be applied to the push side of the door only (the side with the door stops-see Figure 3).
The actuating plunger needs to be applied to the hinge side of the door for all applications.

Place the automatic door bottom against the door

Once you have the automatic door bottom leveled and positioned correctly, with a pencil or marker mark
where the attachment screws need to be drilled.


STEP 3: ATTACHING THE AUTOMATIC DOOR BOTTOM:

 
How to Install an Automatic Door Bottom- Figure 4

To make installation easier you can drill a pilot hole which will ensure you attach the door bottom to the correctly marked spot (see Figure 4).
With the screws provided, screw in the automatic door bottom.

In some models, a plate is provided for the hinge side of the frame. This will protect the door frame from getting worn down by
the actuating plunger. If provided, attach to corresponding point on the frame.


STEP 4: TESTING YOUR AUTOMATIC DOOR BOTTOM:

 
How to Install an Automatic Door Bottom- Figure 1

Now that the door bottom is attached, test the door bottom by opening and closing the door to ensure there is a full seal.
If the seal does not come down far enough twist the brass nut out, if it seals too tight twist the brass nut in (see Figure 5).


Once you have followed through with all the instructions your Automatic Door Bottom is good to go! Enjoy years of quality sound, draft and light infiltration control with your new door bottom.

For additional assistance and product information, feel free to contact us. Our trained and friendly staff will guide you with all your soundproofing needs.

Shipping & Returns

Shipping and Return information is specific to this product page only (not for other products on our site).

  • Shipping:
    • Standard stock sizes (available above) ships within 1 business day.
    • For custom sizes ordered through our office, please allow 7-14 business days to ship.
    • FREE SHIPPING for orders over $300.00 in the USA (excluding Alaska and Hawaii). A flat fee of $19.99 will be applied to orders under $300.00.
    • Ships FedEx Ground.
       
  • Returns:
    • Product can be returned in new condition up to 30 days from date of purchase.
    • Please call or email us to receive an RMA number before returning. No returns will be processed without an RMA number.
    • Return shipping is customer's responsibility.  Return address will be provided along with RMA number.
    • If you are shipping via USPS (not recommended) do NOT require signature as we will not be able to pick up your package from local post office facility.
    • Click here for more information on our Return Policy.
Send to friend
: *
: *
: *
 
Related products
Reviews
Recently Viewed
Q&A