Resilmount A237R - Resilient Sound Clip With Rubber

Resilmount A237R - Resilient Sound Clip With Rubber

TMS Silent A237R Direct Fixing Furring Channel Resilient Sound Isolation Clip 

  • Mechanically decouples walls, ceilings and floors to meet building standards.
  • Breaks the transfer of sound waves by isolating the building structure.
  • See Product Data Tab for sample applications.
  • Priced per piece

24 HOUR SHIPPING!

FREE SHIPPING applies for orders over $300.  See Shipping and Returns tab below for additional information. 

Price: $4.39
Qty
Save to wishlist
Note: you must order at least 10 items
Made in USA
Fast turnaround
SKU RES-A237R
Quantity Price
100-499 Items $3.99
500-999 Items $3.79
1000+ Items $3.49
*Note:
Description

Acoustic control of airborne and structure-borne sound in high-density residential areas are a significant concern for contractors.  TMS Silent Clips - A237R are well suited for solving this problem and can increase STC points by a minimum of 7 points through simply replacing standard direct fixing clips with Silent Clips. 

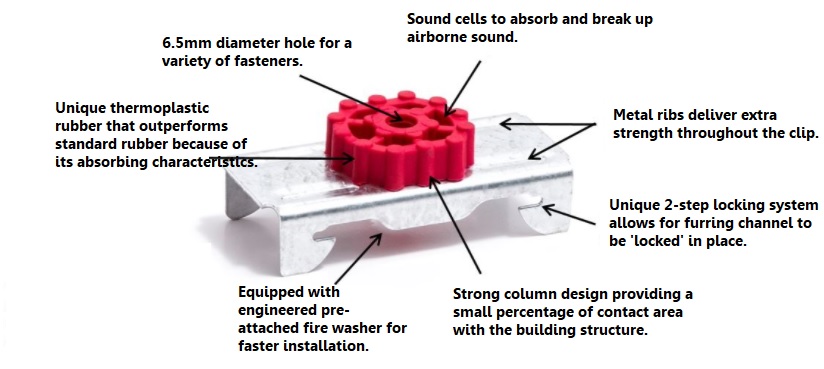
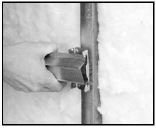
A237R clips are used in the process to create a "floating wall or ceiling" where walls or ceilings are decoupled to create resiliency and break sound waves.  The unique sound cell design of the A237R clips guards against structure-borne vibrations transferring into the body of the clip and leaving just a small percentage of contact surface area between the clip and the structure or substrate that it is fastened to. This aids in absorbing and breaking up airborne sound at its transfer point.  In addition, its patented thermoplastic rubber outperforms standard rubber with its unique natural absorbing characteristics.  

Clips are designed with a 1.4" inch opening to be applied to any substrate using screws or masonry anchors.  A237R clips are designed to hold a furring channel with one or more layers of gypsum wallboard attached.  The load capacity of the clips depends on the gauge of the hat channel used.  They can be used in both wood and steel applications.

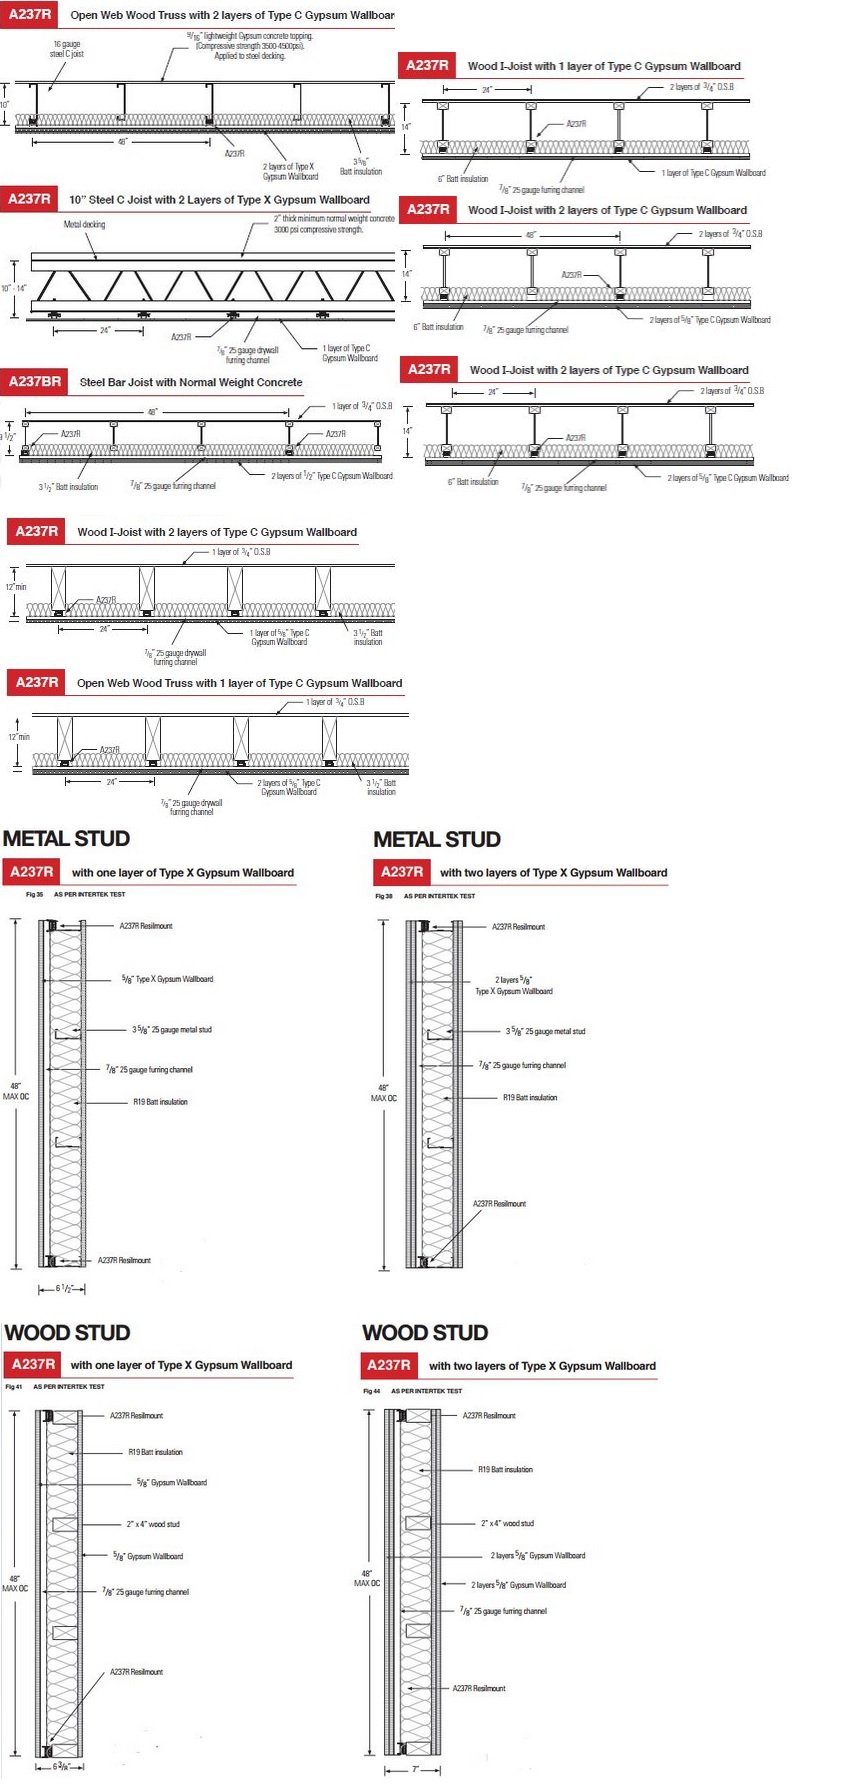
It is UL Classified for use in a 1 hour assembly with 1 layer of 5/8" drywall, making it well suited for use in apartments, condominiums and other applications in sound control.  It can be used to soundproof ceilings and walls in many fire-rated acoustic applications.  (see our Product Data tab for Acoustic and Fire-Rating test results.)

Features:

  • Engineered thermoplastic rubber with outstanding sound absorbing characteristics
  • Simple design; adaptable to hundreds of applications
  • Consistent and reliable quality; manufactured under ISO9001 quality control system
  • Cost effective solution to isolate airborne noise
  • Equipped with pre attached fire washer
  • Unique 2 step locking system allows for Furring Channel to be locked in place
  • A237R clips can be used to suit 7/8" and 1 1/2" furring channels
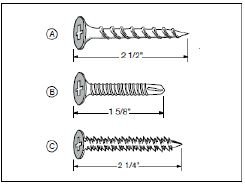
  • A237R clips are provided with a 1/4" hole for a variety of fasteners
  • 1 hour and 2 hour fire-tested

Applications:

  • Multi-family housing
  • Mixed use commercial buildings
  • Studios
  • Home Theater 

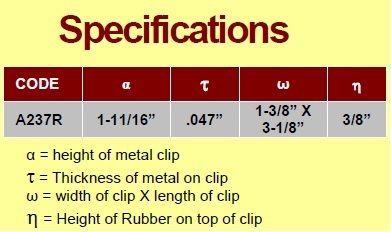
A237R Clip Specifications:
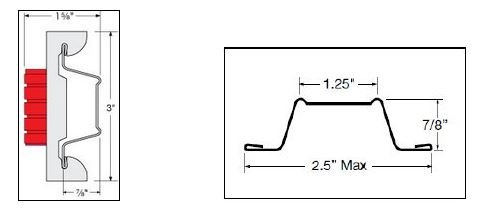
  • Width: 1.375"
  • Height: 3.25"
  • Depth: 1.125"
  • Weight: 0.25 Lbs.
  • Max spacing between clips: 48" OC
  • Max load: 36 Lbs.

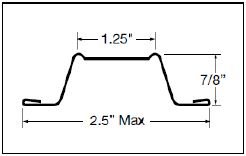
Hat Channel Specifications:

  • Height: .875"
  • Width: 2.5"
  • Length: Typically 12'
  • Splicing: 6" min. overlap, secure laps with 2 steel framing screws or wire.

How Many To Order:

Clips can be spaced up to 48" apart with spacing of up to 24" between channels.  When using this spacing, divide the square footage of the area to be treated by 5.  That will give a rough estimate of the amount of clips needed.  In most cases you will need to compensate for being within 6" to walls/ceilings so we have found that calculating the square footage by 23% should get you close to the amount of clips needed.  See Installation Tab above for layout diagram. 

For detailed usage see our How To Soundproof Article

Need help planning your soundproofing project?  You can always call our office at 845-388-1200 with any installation questions that arise.  Feel confident when placing your order with Trademark Soundproofing, as we are always here to assist you with installation advice and tips.  We are the only soundproofing company that is constantly installing the products we sell, so we have the answers!

Product Data

Printable Documents:

Click here to view and print Product Specs.

Click here to view and print Testing Data for Floor and Ceiling Assemblies.

Click here to view and print Testing Data for Metal Stud Assemblies.

Click here to view and print Testing Data for Wood Stud Assemblies.

A237R Clip Features and Specifications:

 A237R Specifications

Dimensions for A237R and Compatible Hat Channel:

A237R Dimensions

Classifications:

A237R Classifications

Sample Applications:

A237R Clip Sample Applications

Installation Guide

Printable Documents:


A237R Installation Guide


General Installation Information for Walls and Ceilings:


Resilient Mount Clip Specifications:

  • Width- 1.375"
  • Height- 3.25"
  • Depth- 1.125"
  • Weight- 0.25 Lbs.
  • Max spacing between clips- 48" OC
  • Max Load-36 Lbs.

Furring Channel Specifications:

  • Minimum- 25 Gauge with hemmed edge
  • Depth- 7/8" or 1-1/2"
  • Width at top- 1-1/4"
  • Width at bottom- 2-1/2"

*When splicing hat channel, overlap 6" in between two Resilmount clips.  Secure the channel with two 7/16" framing screws or 18 Gauge tie wire can be used.

*Available at your local building supply stores

Fasteners:

Wood: #8 x 2-1/2" Coarse Threads

Steel: #8, #10 or #12 x 1-5/8" Self Tapping Type S

Concrete: 3/16" x 2-1/4" Anchor Screws

DO NOT fasten Resilmount clips to framing members with nails.  Use only approved screws


Installation for Walls:


Installating Resilient Clips

Resilient Clip Installation

Installation for Resilient Mount Clips

  • Resilient Mount Clips shall not exceed 48" on center
  • Spacing between hat channels shall not exceed 24" 
  • Fasten the Resilient Mount Clips to the substrate with a fastener approved for a minimum pull-out and shear of 120 Lbs. 
  • Locate the bottom row of Resilient Mount Clips within 3" of the floor.  (May be adjusted lower to accommodate installation of baseboard.)
  • Hat Channels are installed horizontal to the floor.
  • Use a 4' level to ensure that Resilient Mount Clips and furring channels are installed horizontal and level.
  • Install the drywall vertically from the bottom up leaving a 1/4" thick gap around the perimeter of the wall to be filled with acoustical caulk.  Caulk around the entire perimeter of the gypsum board.

Step 1:

Review layout guidelines before starting installation of walls or ceilings.  We suggest installing the ceiling first, before installing the walls.

Step 2:

Space Resilient Clips so as not to exceed 48" OC.  Secure clips with a single fastener through the middle screw hole in the clip (Fig 2.1).

Wood: Use #8 x 2-1/2" coarse thread screws

Steel: Use #8, #10 or #12 x 1-5/8 Type s Self tapping screws

Concrete: Use 3/16" x 2 1/4" Tapcon or equal anchor

Step 3:

Snap hat channel on Resilient Mount Clips (Fig 2.2)

Step 4:

The floor shims are critical to ensure best results.  Place 1/4" shims on floor in front of sole plate (Fig 3.1).

Install the first row of drywall vertically against the wall (Fig. 3.2).  

Attach drywall to channel following local building codes.  

Note: Only remove the shims after all the gypsum board is completely screwed to all furring channels.

Step 5: 

Use acoustical caulk around the entire perimeter of each wall (See Figure 3.3) 


Installation for Ceilings:

 
Decoupling Walls and Ceilings with Hat Channels
  • Resilient Mount Clips shall not exceed 48" on center.  
  • Spacing between hat channels shall not exceed 24" 
  • Fasten Resilient Mount Clips to the substrate with a fastener approved for a minimum pull-out and shear of 120 Lbs. 
  • Locate the first row of Resilient Mount Clips within 6" of the wall and within 6" of the opposite wall.
  • Hat Channels are installed perpendicular to the joists.
  • Install the gypsum board leaving 1/4" thick gap around perimeter to be filled with acoustical caulk.  
  • Caulk around the entire perimeter of the gypsum board. 

Step 1:

Review layout guidelines before starting installation of walls or ceilings.  We suggest installing the ceiling first, before installing the walls.

Step 2:

Space Resilient Mount Clips so as not to exceed 48" OC.  Secure clips with a single fastener through the middle screw hole in the clip (Fig 2.1).

Wood: Use #8, #10, or #12 x 1-5/8" Type s Self tapping screws

Concrete: Use 3/16" x 2-1/4" Tapcon or equal anchor 

Step 3:

Snap hat channel onto Resilient Mount Clips. (Fig 2.2)


Optimal Layout:

 
  For a printable version of Optimal Layout for Resilmount Clips, please visit.  
Layout for Studs with A237R Clips  
Shipping & Returns

Shipping and Return information is specific to this product page only (not for other products on our site).

  • Shipping:
    • Product ships within one business day.
    • FREE SHIPPING for orders over $300.00 in the USA (excluding Alaska and Hawaii). A flat fee of $19.99 will be applied to orders under $300.00.
    • Ships via major carriers, such as UPS or FedEx Ground, with tracking information provided.


  • Returns:
    • Product can be returned if it is in brand new condition for up to 60 days from the date of purchase.
    • Please call or email us to receive an RMA number before returning. No returns will be processed without an RMA number.
    • Return shipping is customer's responsibility. A return address will be provided with RMA#.
    • If you are shipping via USPS (not recommended) do NOT require signature as we will not be able to pick up your package from local post office facility.
Send to friend
: *
: *
: *
 
Reviews
Recently Viewed
Q&A