

How to Soundproof: Floors, Ceilings, Walls & Doors
This soundproofing article follows the Soundproofing Basics article and is intended to give you a step by step instruction on how to soundproof a home, hotel, condo or office that is under new construction.
In our Soundproofing Walls & Ceiling article we address retrofit soundproofing for existing floors, walls and ceilings.
As with all the articles in our Soundproofing Series, this is a practical, short and concise overview. For more in depth understanding of the science behind sound control, please browse our Understanding Soundproofing articles on the main menu.
How to Soundproof Floors
Being that the sub floors are put down as part of the framing we will begin with soundproofing the floors.
The Challenge: Aside for airborne sound coming through the ceiling, soundproofing floors face an additional challenge called Impact Noise (e.g. footsteps or an object being dropped, see Figure #1 below). Impact Noise is very difficult to control since the impact actually shakes the entire structure, creating vibrations.

|
Labs often test Impact Noise, called IIC (Impact Insulation Class), however they use a tapping machine which does not compare to heavy footsteps or items being dropped. This lowers the accuracy and reliability of the test results and your structure may not perform well in actual life conditions.
To counter this problem, there are many Floor Underlayment products being sold on the soundproofing market, some at very steep prices, with varying degrees of effectiveness. We cannot claim that we have tested every one of them; however, judging by the amount of customers calling us complaining about the inadequacy of their existing floor systems and the positive feedback we receive after offering our soundproofing advice, we are certain that the products we recommend and offer are unsurpassed. As a plus, our systems can be purchased at a fraction of the higher end product costs.
The Solution: Due to the complexity involved in soundproofing floors, we try to utilize as many techniques as we can in the system. Therefore, we will start with the most effective system and also mention an option of a lesser degree, for those who are on a budget.
Step 1: Install Subfloor and Joist Gasket Tape
A) Start by applying Joist Gasket Tape on each of the floor joists. This closed cell tape will decrease footfall and impact noise and some airborne noise. Additionally this will eliminate future floor squeaks which occur from the sub floor rubbing against the floor joists.
[Customer Review: "I am VERY glad I went with that choice. I and all the guys helping me with the installation couldn't believe what a difference this joist tape made. It certainly prevents problems associated with direct contact between the joists and the subfloor, and there seems to be validity to the statement that it reduces transfer of footfall noise."]
B) Above your Joist Gasket Tape and Joists, install your sub floor and apply Green Glue Noiseproofing Compound onto it, using two tubes for every 4” x 8” sheet.
C) Add a 2nd layer of Subfloor perpendicular to the first layer sandwiching the Green Glue in between. Screw down the 2nd layer to the floor joist as you would to a typical subfloor.
D) Optional: For greater footfall sound control, lay down Rubber Underlayment before applying finished floor.

|
Complete floor layers should look as follows (See Figure to the Right): Layering Bottom to Top:
|
Pro Tip: Installing the above steps before framing your walls will give you the best results as this will prevent sound seepage through the wall framing and will ensure one continuous sound barrier with no breaks.
Step 2: Caulk the Floor Perimeter
If you installed the 2nd layer once your walls were frames; Caulk the perimeter of the room with a high quality Acoustical Caulk to ensure a proper seal.
Step 3: Apply Carpet or Floor Coverings
Install your floor as you would above any sub floor. If you are applying carpet, we recommend installing the thickest Carpet Underlayment possible. (You can go all out and use a premium carpet underlayment).
You have now completed half the job - the other half will be securing the ceiling below the floor, as follows:
How to Soundproof Ceilings

|
Even with your walls and floors fully soundproof, sound waves can still travel through your ceiling if it is not properly fortified, see figure to the left. To counter this problem: Step 1: Optional – Add Green Glue Between Subfloor and Drywall: For superior sound control, cut strips of drywall to fit in between the ceiling joists. Apply Green Glue on the strips and screw into the underside of the sub floor, sandwiching the green glue between the sub floor and drywall.You can double up by doing the same thing with another strip of drywall over the first. This step may be omitted if you are on a budget or if it involves too much labor for your project. |
Step 2: Apply 1 lb. Mass Loaded Vinyl (Optional)
For additional airborne sound control, you can apply a layer of 1 lb. Mass Loaded Vinyl (MLV) directly to the ceiling joists before installing drywall. MLV is a dense, flexible material designed to add mass and block sound transmission. Secure it tightly to cover the entire ceiling area, overlapping seams slightly and sealing with acoustical caulk or tape. This step is optional, but it significantly improves results when combined with resilient channels, insulation, and double drywall with Green Glue.
Step 3: Use Resilient Sound Clips

For detailed installation information, see our Resilient Sound Clip Installation Guide.
Step 4: Apply Hat Channels
Run 7/8″ wide, .25″ gauge Hat Channel through your clips, overlapping all ends by at least six inches and screwing together with self-drilling sheet metal screws.
Step 5: Install Ceiling Insulation
Install Fiberglass Batts in between your ceiling joists; be sure to put some on top of any recessed lighting that you may have.
Pro-Tip: Keep recessed lights and HVAC ducts to a minimum on ceilings that you are trying to soundproof.
If you want to use recessed lights we recommend using a Surface Mounted LED. These look like recessed lights but use a simple Junction box which can be wrapped with a putty pad.
For full recessed lights, consider using a Recessed Light Sound Control Cover.
Step 6: Apply Drywall Layers: Raise your drywall into place and screw into channels using recommended drywall screws. [Do not attach drywall to ceiling joists in any way as this will compromise the floating ceiling that you have created].
Step 7: Add Green Glue Between Drywall Layers: Apply Green Glue to the back of a 2nd sheet of drywall, using 2 tubes for every 4” x 8” sheet. Screw the 2nd sheet of drywall into channels using longer screws. (This step can be omitted if you are on a budget, especially if you have installed the Green Glue on the floor above).
Step 8: Use Surface Mounted LED Lights:
Standard recessed lights will cut a hole right thru the soundproofing project and when you have multiple lights they will seriously compromise the soundproofing. Surface mounted lights can use a simple junction box allowing you to use a putty pad on the box and to just cut a small hole for the wires to pass thru.

|
Step 9: Caulk All Perimeters: Caulk the perimeter (and the seams, if you only used 1 layer of drywall) using high quality Acoustical Caulk.Additionally, caulk the space between the recessed lighting and the drywall. |
How to Soundproof Walls
Step 1: Add Wall Insulation: Install fiberglass in between the studs (R-11 Insulation for a 2 x 4" Framing and R-19 for 2 x 6" Framing).
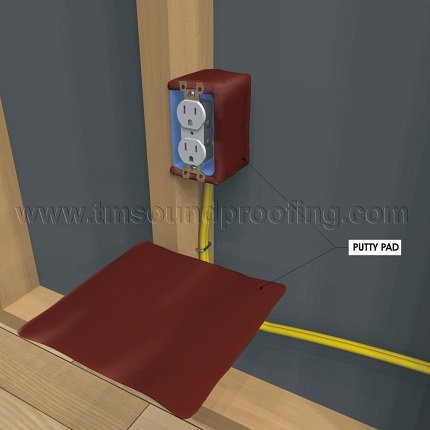
Step 2: Seal Outlet Boxes with Putty Pads
|
|
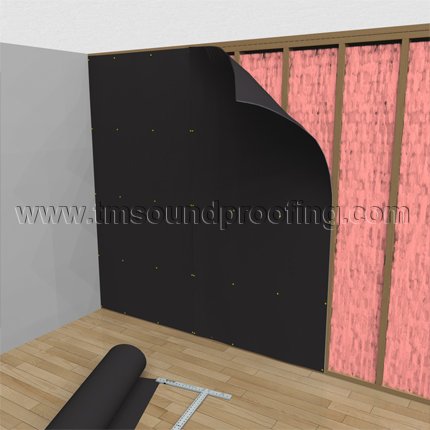
Step 3: Optional – Apply Mass Loaded Vinyl
|
|
Step 4: Install Resilient Sound Clips on the face of the studs using the following guide: Whisper Clips Installation Guide.
5) Follow Steps 4-7 in Ceilings (apply Hat Channels, apply Drywall, apply Green Glue, apply another layer of Drywall and Caulk) See images below.

|

|
Step 5: Seal Electrical Boxes and Outlets
Make sure to seal around all electrical outlets and close up all holes. To easily sound seal electrical outlets, we recommend applying our STC Seal for Outlet and Electrical Boxes, which can be added after the drywall has been applied. (Acoustical Outlet Putty Pads can also be used, however these need to be added before drywall is installed).
Step 6: Alternative – Double Drywall with Green Glue
Another simple option is to install 2 layers of drywall with Green Glue directly onto the studs.
Pro-Tip: We HIGHLY recommend treating the ceiling of the room the same way as the wall, due to high percentage of sound leaks over the walls thru the ceiling, as noted above.
The obvious question that we are frequently asked is: Do I need the clips on the wall or is the green glue alone enough? The answer depends on what level of soundproofing you are looking to achieve, what type of noise you are trying to block, and if you have access to both sides of the wall.
If the noise you are trying to control is standard talking, phone ringing, and some music, then you will have a tolerant level by using drywall and Green Glue, either by doing it on both sides of the wall, or by doubling up on one side. (Whenever possible, always try to soundproof the noise source side). However, if the noise is extremely loud or very low bass, like a loud home theater (where you can feel the vibrations), or you want the best soundproof wall available, then you should use the Whisper Clips and a double layer of drywall, with Green Glue on the other side or on the side of the clips.
How to Soundproof Doors
Step 1: Add Mass to Doors
To add mass to your door, use flat panel, solid core doors and add a ½" Medium Density Fiberboard (MDF) panel to it.
Step 2: Apply Green Glue for Damping
Adding Green Glue Noiseproofing Compound between the MDF and door creates damping.
Step 3: Seal Gaps with Door Gaskets and Automatic Bottoms
Use Automatic Door Bottoms, Door Gaskets and other Soundproofing Door Hardware to firmly seal the gaps around the door.
Step 4: Soundproof Pocket Doors (Optional)
Pocket doors creat a unique challenge when trying to soundproof and should be avoided when possible. If you must use a pocket door use our Soundproof Pocket Door Kit for best results.
For more detailed info see our How to Soundproof a Door article.
© Trademark Soundproofing 2019, Revised 2025
 . I am not familiar with the use of EPDM as it applies to soundproofing. In general it would depend on the weight. I would suggest that at least for the ceiling you should consider swapping out the EPDM for mass loaded vinyl. I would also simplfy your ceiling construction by eliminating the 2x3 grid system which will not add much as you will get the extra air space and proper decoupling with the