1 LB. Foil Faced Fire Rated MLV, 135 Sq. Ft.

1 LB. Foil Faced Fire Rated MLV, 135 Sq. Ft.
Foil Faced MLV Applied To Ductwork

Class A fire rated mass loaded vinyl with foil facing. Specifically engineered for efficient sound isolation for a wide variety of applications including wrapping ducts, noisy pipes and valves. Sold per roll 4.5' X 30' with a total coverage of 135 square feet.

PRICED PER ROLL

SEE BELOW FOR ADDITIONAL INFORMATION

Price: $399.99
Qty
Save to wishlist
Made in USA
SKU MLV01x30
Quantity Price
5-9 Items $379.99
10+ Items $349.99
*Note:
Description

Features:

  • 1 LB. per Square Foot for a total of 135 square Feet
  • 4.5' X 30' Roll
  • Foil Faced
  • STC rating of 26
  • ASTM E-84 Class A Fire-Rated

Best Used for:

  • Used for wrapping noisy pipes, ducts and valves.
  • Can be combined with a quilted fiberglass decoupler for improved acoustical performance, thermal conductivity and lower installation cost.
  • Wide variety of applications where fire-rating is a concern.

How Much Do I Need:

Measure the square footage of the area that will need to be covered to determine amount needed. It is recommended to add an additional 10% to compensate for waste and overlapping of seams between studs.

Additional Products to Consider:

  • This product is also available in 4' x 50' rolls, please contact us or call our office at 845-388-1200 for details and pricing.
  • Can also be ordered with options such as Reinforced MLV Rolls, and Foil/MLV/Fiberglass Decoupler product. Please contact us or call our office at 845-388-1200 for details and pricing.
  • MLV Nails for installation on wood surfaces.

FREE SHIPPING! Shipping is included in the price, see Shipping and Returns information to the right.

Click here for our Foil Faced Mass Loaded Vinyl with Fiberglass Decoupling.

Product Data

Product Specs:

Foil Faced MLV Product Specs

STC Rating:

Foil Faced MLV STC Rating

Installation Guide

Click to Print Mass Loaded Vinyl Wall Installation Guide.

Mass Loaded Vinyl can be applied to walls, ceilings, floors and structures to create a sound barrier. Mass is a critical component in sound control and works by simply stopping sound from being able to vibrate the structure due to its heavy weight.

Please read through the installation guide before installing your MLV.

STEP 1: MEASURE AND TRIM YOU MLV

   
Figure 1- How to Install MLV  

Measure your wall from top to bottom. Deduct 1/8” – 1/4” from total height.

Unroll your MLV on the floor. With a utility knife, use a straight edge ruler to cut a square edge evenly through the MLV. {See Figure 1}

You do not need to cut through the material fully, once it is scored, it will come apart easily.

The MLV can also be cut with a heavy duty scissor.

STEP 2: PREPARE YOUR WALL FOR INSTALLATION

   
Figure 1- How to Install MLV   For superior soundproofing results, use Acoustical Outlet Backer Putty Pad around all electrical outlets and other obstacles. {See Figure 2}

STEP 3: APPLYING YOUR MLV

   
Figure 1- How to Install MLV  

This step requires the work of two people.

The MLV is applied over the fiberglass installation and beneath the sheetrock.

With the help of another, hold the MLV in place, starting at the upper corner of the wall. Ensure the sheet is straight

along the ceiling and is evenly spaced between the floor and ceiling {See Figure 3}

Fasteners: Any type of fastener will work (especially if the MLV will be covered with drywall) we suggest roofing nails or screws

with washers, however you can also use a pneumatic cap stapler.

Figure 1- How to Install MLV   Placement: Place fasteners every 8” along the top and bottom plate {See Figure 4} and down the length of the stud.

STEP 4: EXPOSE YOUR ELECTRICAL OUTLET BOXES


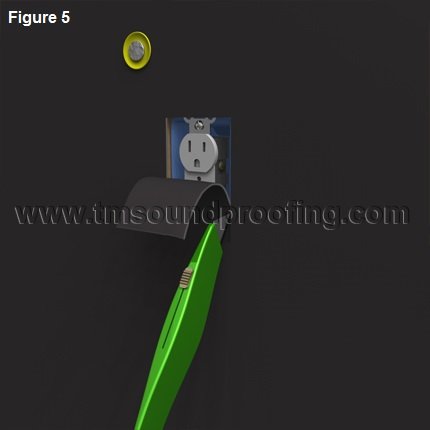
Be careful not to cover electrical outlets boxes. It is best to expose the outlets boxes as you install each length of MLV.

Find the electrical box in your wall and gently press the MLV against the box. Using a razor blade carefully cut the

opening along the edges of the box. Keep this hole tight as possible to the electrical box so that you maintain

a good seal. {See Figure 5}

Any extra gaps can be filled with Acoustical Caulk.

Continue as above until your entire wall or ceiling is covered in MLV.

STEP 5: FINISH YOUR SEAMS

   
Figure 1- How to Install MLV  

Where MLV seams fall on a stud, butt pieces against one another on the stud and fasten into place. You can add a strip of

PVC Tape on the seam. {See Figures 6 and 7}

We highly recommend that you end all MLV seams on a stud, as free hanging seams may come apart with time.

Figure 1- How to Install MLV    
Figure 1- How to Install MLV   Where MLV seams falls between studs, overlap pieces by 2" and tape seams with PVC Tape or similar tap. {See Figure 8}
Figure 1- How to Install MLV   Notch the ends to lay flat. {See Figure 9}

Once all strips of MLV have been applied, drywall can be installed above it and you can be ensured a sound-secure structure! For more information about MLV, contact us or call us at 845-352-3200. 

Shipping & Returns
Shipping and Return information is specific to this product page only (not for other products on our site).
  • Shipping:
    • Please allow 2-3 business days to ship.
    • FREE SHIPPING! - Applies to orders shipped within the USA (excluding Alaska and Hawaii).
    • Shipping is included in the price and will need to be covered by the customers in the event of a return, see below.
    • Ships FedEx Ground, or Truck Freight for multiple rolls.
       
  • Returns:
    • Product can be returned up to 60 days, if in brand new condition.
    • A 20% restocking fee will be applied.
    • Please call or email us to receive an RMA number before returning. No returns will be processed without an RMA number.
    • Return shipping is customer's responsibility. A shipping address will be provided toghether with the RMA.
    • If you are shipping via USPS (not recommended) do NOT require signature as we will not be able to pick up your package from local post office facility.


Send to friend
: *
: *
: *
 
Reviews
Recently Viewed
Q&A